I use NetBeans for java programming but the Geneious team doesn’t have directions for importing their sample projects into NetBeans, so I thought I’d post my own workflow for starting a plugin project. One of the things you need to be aware of is that a standard NetBeans project maintains its own ant build script, and for normal projects, you often don’t even need to edit it. They also provide a lot of ant task stubs that you can use to customize the build process. It is possible to build a Geneious plugin using the standard project template by customizing the ant task stubs and in fact thats how I built the first version of the InterProScan plugin, but since then I’ve found that its a lot easier to use the build.xml file that comes with the plugin templates.
This guide assumes that you are already somewhat familiar with NetBeans and the Apache ant build tool.
Start NetBeans. From the new project window select “Java Free-Form Project.”
In the Location text field, navigate to one of the example projects in the examples folder of the geneious dev kit. After selecting that folder, the Build Script, and other fields should be automatically filled in with the correct values. Click Next.
Build And Run Options: The next screen lets you map buttons in the NetBeans toolbar to targets in the build.xml file. the build and clean buttons should already be mapped. We’ll set up the other buttons later. Click Next.
Source Package Folders: On the next screen you configure the source package and the Java version you’re coding for. Select JDK 1.5 because that’s the minimum java version that Geneious supports. Click Next.
Java Sources Classpath: In here you can add paths to any dependent java libraries. These are used by NetBeans for code completion and other features. They should be the same as the classpath that you’ll add to your ant script later. You can go back and fill this in later because first we have to rename the plugin template folder and re-import it. For now, just click Next.
Project Output: the directory you specify here is used when you run the debugger. I set this to the build directory inside the project folder. I’m not sure if that’s right, but so far I haven’t had any problems, and debugging works fine.
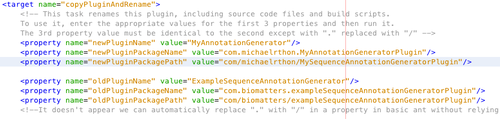
Now we need to create a copy of the project template and rename it. You will see the project list on the left side of the screen. Open the project that you just imported, ExampleSequenceAnnotationGenerator, and open the ant build script (build.xml). We’re going to customize the copyPluginAndRename target.
Modify the target with your new project parameters, like this:
Right click (Mac users can control-click) on the copyPluginAndRename target in the file navigator (lower left corder of the screen) and select run from the pop-up menu. This will create a copy of the project and rename the folder and files, but it won’t import it into NetBeans.
Now you can import the renamed project and start to customize it. Just select Open Project from the File menu and open your renamed project. It’s in the same folder as the ExampleSequenceAnnotationGeneratorPlugin template.
NetBeans runs your project using an ant target. In the ant target you can define your classpath, the main class and other parameters. Here is the run target that I use for my InterProScan plugin project. Copy and paste it into your build.xml file and edit the paths to match your project.
<target name="run">
    <java classname="com.biomatters.iseek.application.ISeekMain"
    dir="../GeneiousFiles"
    fork="true">
        <arg value="extraPlugins=com.michaelrthon.geneiousplugins.interproscan.InterproscanPlugin"/>
        <jvmarg value="-ea"/>
        <jvmarg value="-Xss512K"/>
        <jvmarg value="-Xms256M"/>
        <jvmarg value="-XX:MaxPermSize=96M"/>
        <jvmarg value="-Xms256M"/>
        <env key="DYLD_LIBRARY_PATH" value="./activation/macos:./trusted_storage_libs/macos"/>
        <classpath>
            <fileset dir="../GeneiousFiles/lib">
                <include name="*"/>
            </fileset>
            <pathelement path="../GeneiousFiles/iSeek.jar"/>
            <pathelement path="../GeneiousFiles/resources"/>
            <fileset dir="classpath">
                <include name="*.jar"/>
            </fileset>
            <pathelement path="classes"/>
            <pathelement path="com.michaelrthon.geneiousplugins.interproscan.InterproscanPlugin"/>
        </classpath>
    </java>
</target>
Right click on your project in the Projects browser on the left side of the screen. Select Properties in the pop-up menu and ensure that the run button is mapped to the run target you just created. Try to run your project by clicking on the green run button in the toolbar. If everything is set up correctly, you should see Geneious start up.
The last thing to set up is the debugger, but its going to be easy as long as your run target is working correctly. the first time you try to start your project in the debugger, NetBeans will know that you don’t have a debug ant target and offer to create one for you. Let it, and it will create a debug target using your run target as a template. This target lives in the nbproject/ide-targets.xml file inside your project, in case you ever need to edit it. For me, it just works without any editing, as long as the run target works before your try to run the debugger.
Well, thats about it. Your project doesn’t have unit testing set up yet but I’ll cover that in a future post. If you see any errors in this guide, please let me know!